使用 Cloudfront Lambda@Edge 实现图片格式转换
Cloudfront Lambda@Edge 可以在边缘端完成一系列逻辑操作。 本文使用 AWS Serverless Application Model(AWS SAM) 实现了将图片处理成 WebP 格式。
应用场景
本示例描述了如下场景:
- Cloudfront 的图片路径为:
/{bucket_bucket}/{s3_key} - 客户端的 headers 里如果包含 Accept 为 image/webp,则处理图片为 webp 格式
- 如果不满足上述条件,则重写 Url 为
/{s3_key},直接将 request 导向相应的存储桶
SAM 应用开发过程
创建应用
sam init
一些选项:
- 选择 python3.9, ZIP (这是默认的)
- hello_world 模版即可
完成之后,SAM 会建立一个项目模板。进入项目目录。
我本地的项目名称为 webp-processor,SAM 系统会以此名字创建一系列资源。
修改配置
由于我们无需 API Gateway 触发器,可以删除项目根目录下 template.yaml 的关于触发器内容,并增大 Timeout 的时间,如下:
Globals:
  Function:
    Timeout: 30
Resources:
  CloudfrontFunction:
    Properties:
      # Events:
      #   HelloWorld:
      #     Type: Api # More info about API Event Source: https://github.com/awslabs/serverless-application-model/blob/master/versions/2016-10-31.md#api
      #     Properties:
      #       Path: /hello
      #       Method: get
Outputs:
  # HelloWorldApi:
  #   Description: "API Gateway endpoint URL for Prod stage for Hello World function"
  #   Value: !Sub "https://${ServerlessRestApi}.execute-api.${AWS::Region}.amazonaws.com/Prod/hello/"
代码解读
完整的代码请参见文末。
如果检测到无需处理的请求,直接返回 request,并重写 URL:
    request = event["Records"][0]["cf"]["request"]
    if not (uri.endswith(".jpg") or uri.endswith(".png") or uri.endswith(".jpeg")): # 只处理这三种类型的图片
      request["uri"] = "/" + key
      return request
cf 请求过来的 headers 构造比较特殊,如下的示例代码可以方便解析并获取 headers 里的值:
    webpAccept = False
    for accept in headers.get('accept', []):
        if "image/webp" in accept['value']:
            webpAccept = True
            break
本示例中,需要用到 Pillow 库,直接在 requirements.txt 里增加依赖即可。
本地调试
使用如下命令,先 build 再调用:
sam build

sam local invoke -e  ./events/cf.json
后面这个 json 文件是模拟相应的触发器请求,具体数据格式可以参考这个网址:
https://github.com/tschoffelen/lambda-sample-events/tree/master/events/aws
本文测试的 ./events/cf.json 如下:
{
  "Records": [
    {
      "cf": {
        "config": {
          "distributionId": "EXAMPLE"
        },
        "request": {
          "uri": "/test-bucket/web/xxxx.jpg",
          "method": "GET",
          "clientIp": "2001:cdba::3257:9652",
          "headers": {
            "host": [
              {
                "key": "Host",
                "value": "d123.cf.net"
              }
            ],
            "accept": [
              {
                "key": "Accept",
                "value": "text/html,application/xhtml+xml,application/xml;q=0.9,image/avif,image/webp,image/apng,*/*;q=0.8,application/signed-exchange;v=b3;q=0.7"
              }
            ]
          }
        }
      }
    }
  ]
}
云上调试(API Gateway)
如果使用了 API Gateway 作为触发器,那么使用云上调试会比较简单:
sam sync --watch
本地调试使用下面的命令:
sam local start-api
部署更新代码之前,需要调用 sam build。
部署
本地代码部署到线上
测试完成之后,调用如下命令进行部署:
sam deploy --guided
按照提示即可将 Lambda 部署到线上。部署完成后可以在 Lambda 控制台看到 webp-processor-CloudfrontFunction-xxxxx 的 Lambda 实例。
设置 Cloudfront 的缓存策略
由于此场景会通过浏览器的 headers 的 Accept 的值来决定是否处理图片,所以需要设置依据 headers 的 Accept 进行缓存。
进入 Cloudfront 控制台的 Policies,在 Custom policies 面板点击 Create cache policy。
参数如下:
- Name: ForWebP (或者其他任意名字)
- Headers: Include the following headers
- Add Header: Accept
其余默认即可。
进入 Cloudfront 的 Distributions 实例,选择相应的实例,并设置 Behaviors 的 Cache policy 为 ForWebP。
部署 Lambda@Edge
进入 Lambda 控制台,进入刚刚部署的函数 webp-processor-CloudfrontFunction-xxxxx。
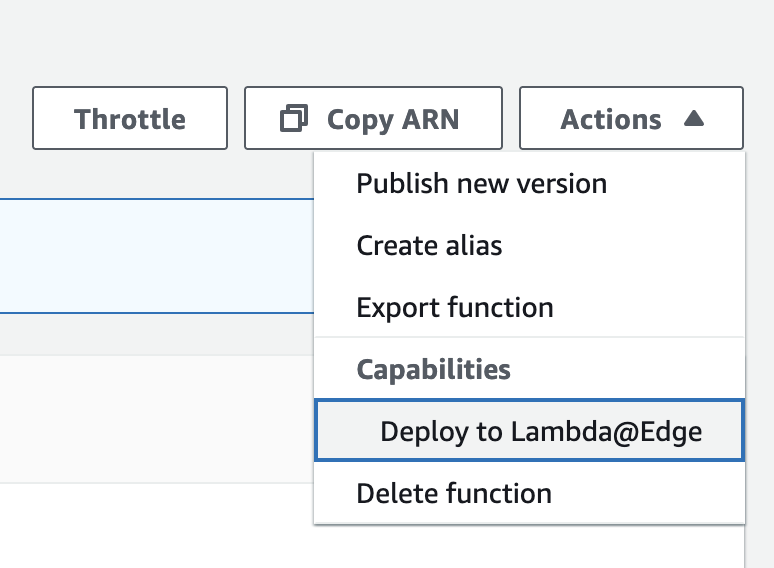
右上角选择 Action -> Deploy to Lambda@Edge,如图:
第一次部署选择:
- Distribution: 对应的 Cloudfront 实例
- Cache behavior: *
- CloudFront event: Origin requset
- Confirm deploy to Lambda@Edge
此处 CloudFront event 只能选择 Origin requset, Viewer Request 只支持小于 1M 的包。
后续升级部署选择 Use existing CloudFront trigger on this function 即可。
坑
本示例的特殊之处
本示例使用了一个 Cloudfront 映射多个 S3 存储桶,设置 Origins 的时候,需要设置多个 S3 存储桶,请注意这里的 Origin path 需要留空。
同时需要设置多个 Behaviors,规则为: Path 是桶名称,对应到 S3 的相应的桶。
登录 public ecr
在执行 sam local invoke 的时候,需要提示 docker login 登录。使用如下命令:
aws ecr-public get-login-password --region us-east-1 | docker login --username AWS --password-stdin public.ecr.aws/lambda/python
之后调试的过程中,如果出现 Error: Unknown API error received from docker 的错误,大概率也是需要执行此命令重新登录。
设置 Cloudfront@ edge 的权限
需要编辑 lambda 的执行 role 的 信任关系,加入 edgelambda.amazonaws.com 这个 Principal。
{
 "Version": "2012-10-17",
 "Statement": [
  {
   "Effect": "Allow",
   "Principal": {
    "Service": ["lambda.amazonaws.com", "edgelambda.amazonaws.com"]
   },
   "Action": "sts:AssumeRole"
  }
 ]
}
设置 Lambda 执行权限
找到 Lambda 的执行角色,加入对应 S3 Bucket 的读取权限。
限制条件
(到当前为止: 2023-6-26):
-
<= python 3.9
-
edged 端不支持 arm 架构
完整代码附上
import boto3
from PIL import Image
from io import BytesIO
import base64

s3_client = boto3.client("s3")

def lambda_handler(event, context):

    request = event["Records"][0]["cf"]["request"]
    uri = request["uri"]  # 格式:/bucket/key
    headers = request["headers"]

    bucket, key = parse_url(uri)

    if not (uri.endswith(".jpg") or uri.endswith(".png") or uri.endswith(".jpeg")): # 只处理这三种类型的图片
        request["uri"] = "/" + key
        return request

    webpAccept = False
    for accept in headers.get('accept', []):
        if "image/webp" in accept['value']:
            webpAccept = True
            break

    if not webpAccept:
        request["uri"] = "/" + key
        return request

    webp_image = resize_s3_image(bucket, key)

    return {
        "status": 200,
        "bodyEncoding": "base64",
        "headers": {
            "content-type": [{"key": "Content-Type", "value": "image/webp"}],
            "content-encoding": [{"key": "Content-Encoding", "value": "base64"}],
        },
        "body": base64.b64encode(webp_image),
    }


def parse_url(uri:str):
    uri = uri.strip()
    uris = uri.split("/")
    bucket=uris[1]

    return bucket, uri[len(bucket) + 2:]


def resize_s3_image(bucket_name, objectKey):
    s3 = boto3.resource("s3")
    obj = s3.Object(
        bucket_name=bucket_name,
        key=objectKey,
    )
    obj_body = obj.get()["Body"].read()
    img = Image.open(BytesIO(obj_body))

    # (w, h) = img.size
    # img = img.resize((int(w / 8), int(h / 8)), Image.LANCZOS)

    buffer = BytesIO()
    img.save(buffer, "webp")
    buffer.seek(0)
    img.close()

    return buffer.getvalue()